
By Namrata Asthana
You love cappuccinos, but don't want to spend the money to buy an espresso machine with a steamer, or continue going to fancy coffee shops and paying for just one cup? Read on! By virtue of running a coffee company, we realised that a number of our customers use the moka pot, so we decided to send over a brewing recipe - one that makes for great cappuccinos, using a moka pot. We don't love the moka pot for straight up espresso, but it works well if you're adding milk to your coffee.
Note | We're trying to make this as easy to brew as possible - this recipe is actually for a "dry cappuccino," as opposed to a traditional cappuccino. The latter consists of one third espresso shot {60ml}, one third steamed milk {60ml} and one third foam {60ml}. A dry cappuccino, on the other hand, consists of one third espresso shot {60ml} and two thirds foam {120 ml}. So, it'll be just as milky as most people in India like their coffee, but easier to make than a traditional cappuccino. If you're a refined, die-hard cappuccino fanatic, you probably own an espresso machine and this recipe isn't for you. However, if you like playing around with recipes and making the most of what you have, you'll have fun following this recipe at home.
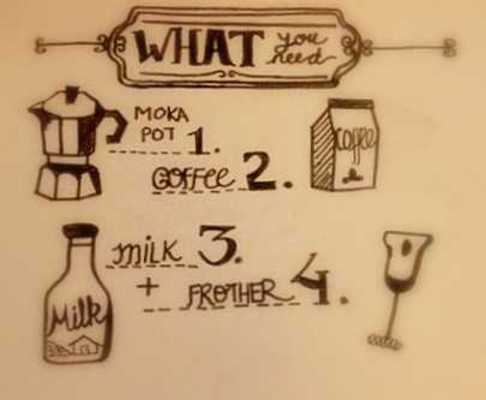
While your moka pot is brewing your coffee {for moka pot brewing tips, see the last section of this post,} start getting your milk ready. What most people tend to overlook is that milk is as crucial to a good cappuccino, as the manner in which you brew your coffee.
Here are a few things to keep in mind when you're preparing your milk |
1. Use fresh, cold milk, straight out of the fridge. Non fat or 2% milk tends to froth better but, as we all know, whole fat milk tastes the best in coffee!
2. Heat the milk on the stove until it reaches around 145 degrees fahrenheit or 62 degrees celcius. If you don't have a thermometer, a good rule of thumb is that you should be able to hold the milk pitcher, but not for long. {A great quote we read about this told us to think about how hot your car hood gets in the summer. The person who said that couldn't have been thinking about the sweltering Delhi summers, but you get the idea}. Make absolutely sure that the milk doesn't start to boil - this ruins the flavor of the milk {if you do end up scalding your milk, though, you’ll find a helpful tip at the very end of this post}.
3. Make sure you whisk the milk constantly while it's heating on the stove, so no skin forms on the milk. We love our Hario frother for creating a great layer of foam.
Now for the coffee.
I know we say this every time we write but it bears repeating – use freshly roasted coffee {preferably coffee roasted no more than two weeks ago}, and use RO or mineral water. No tap water - the boiling may kill the bacteria, but will do nothing to improve the taste of your coffee.
When adding milk to our coffee, we prefer darker medium roasts. We grind specifically for the moka pot, but if you're grinding your coffee beans at home {which is what we recommend for the best and freshest flavor}, your grind should be coarser than an espresso grind, but finer than a drip filter or french press grind.
1. Here’s a tip that very few people use when brewing in a moka pot - pre-heat the water in a kettle before you pour it into your moka pot. This prevents the coffee from getting cooked in the moka pot.
2. Once the water has boiled, pour it into the bottom gasket of the moka pot.
3. Fill the coffee grounds to the top in the filter gasket of the moka pot and level the grounds with your finger or a knife to make sure there are no loose coffee grains in the gasket. Do not tamp the coffee grounds or apply any pressure on them since this risks making the coffee powder very compact.
4. Screw the top and the bottom of the moka pot using a towel or kitten mitts to make sure you don't get burned, and place the moka pot on top of the stove.
5. Once the water starts to get hot in the lower chamber of the moka pot, the pressure from the heat will push the water up so that it mixes with your coffee powder and forces it to come out in the upper chamber. First, you'll see the coffee coming out darker and then, over time, the colour of coffee in the upper chamber will lighten. Once the coffee becomes the colour of a yellow honey, you can take the moka pot off the stove {again, with kitchen mitts or a towel so you don’t burn yourself!}.
6. A great tip for making sure that the coffee grinds are not over extracted is to cool the bottom chamber as quickly as possible, which could entail wrapping a cold, wet towel around the bottom chamber, or just running the bottom of the moka pot under cold water.
7. Pour yourself 60ml of coffee {which is about a ¼ of a measuring cup} and twice that amount of the foam you've been creating while the coffee's been brewing! If you don't care about exact proportions, you can play around with however much coffee and foam you'd like.
Here's what it should look like when you're pouring the froth into your cup at the end.

And there you go, you've got yourself a great cappuccino!
Tip | What do you do if your milk gets overheated and scalded? Don't freak out. Just make yourself a cafe con leche {the very exotic sounding Spanish version of a cafe au lait or caffe latte}. Add a 1:1 ratio of coffee to scalded milk. Usually folks like to use 180ml of coffee and the same amount of milk, but play around with it and see what works for you!
About the Author | Namrata Asthana and her partner Matt Chitharanjan are behind one of Delhi's favourite coffee company's called Blue Tokai Coffee Roasters.
Illustrations | In-house
